
OPNsense: Route subnet over VPN
Sunday, November 24 2019 · Lesezeit: 7 Minuten · 1457 Wörter · Tags: opnsense Achtung! Dieser Artikel ist älter als ein Jahr. Der Inhalt ist möglicherweise nicht mehr aktuell!The piracy rate of movies and TV series dropped significantly after Netflix made its breakthrough. With one monthly subscription you had access to a huge amount of content just one click away. It has never been easier and comfortable. Congratulations to the publishers for stepping out of your comfort zones. Your loss of piracy was reduced quite a bit. But you greedy bastards are pushing your customers towards piracy again. You enforce geoblocking or don’t license your stuff to established streaming servives. You fuckers are spinning up your own streaming services. No one wants to pay for 5 or more streaming services a month. If you don’t change your mind about that your former paying customers are pirating the content again, because it’s easier AND you save a lot of money.
Enough ranting! You came here to get a clue how you can route a whole subnet over a VPN with OPNsense. This can be usefull if you own a business and provide an open Wifi for your customers. You don’t want to be held accountable for torrenting customers. And here is how you can route your guest network over the VPN tunnel:
Getting the OpenVPN config files from your VPN provider
You need a subscription to one of the many VPN providers out there. I personally use ExpressVPN (Reflink!) (🖇️ 🔐) for this, because a friend of mine already uses that service and is more than happy with it. In the end it does not matter. The only requirement is that you can download raw OpenVPN config files from your provider.
Navigate to “Set Up on More Devices”. Choose “Manual Config” on the left hand side. Choose “OpenVPN” on the right hand side and choose a server you want to use. After clicking on its name the download of an .ovpn file should be started.
Configuring OPNsense
Open the downloaded ovpn file in a text editor and follow the next steps precisely!
Import the root CA
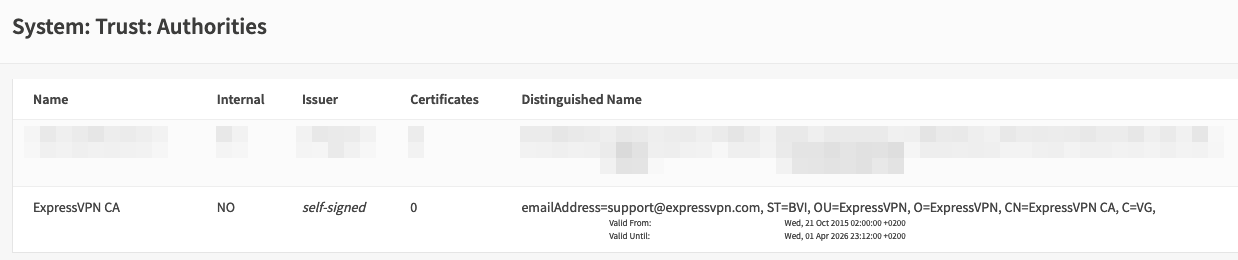
First you need to import the root CA. In your config file there should be <ca> and </ca>. Copy everything between these two tags into your clipboard including -----BEGIN CERTIFICATE----- and -----END CERTIFICATE-----. Navigate on the OPNsense WebGUI to System -> Trust -> Authorities. Click on “Add” and paste the content in your clipboard into the “Certificate data” text field. Add a descriptibe name like “ExpressVPN”.

Click “Save”. There should be an entry in the overview page now.
If you have that: Great! Moving on.
Add your identity
Navigate to System -> Trust -> Certificates and click “Add”. Fill in the blanks like this:
Method: Choose “Import an existing certificte”
Descriptive name: Set a name you like
Certificate data: Copy everything between <cert> and </cert> from the config file.
Private key data: Copy everything between <key> and </key> from the config file.
Make sure you don’t mix the values for cert and key!
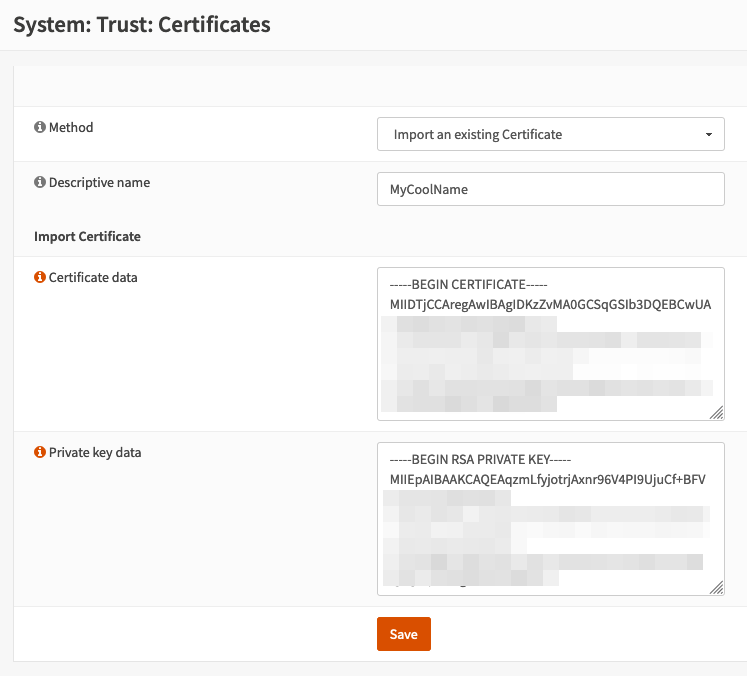
If you are sure about your input hit “Save”.
Adding a VPN client
OPNsense must now be configured as OpenVPN client. Navigate to VPN -> OpenVPN -> Clients and click “New”. Follow these steps again very carefully!
Description: Add a name. I’ve got “Express VPN” here.
Server Mode: Peer to Peer (SSL/TLS)
Protocol: UDP4
Device mode: tun
Interface: WAN
Remote server: Check the config file what’s stated for “remote”. In my case: netherlands-amsterdam-ca-version-2.expressnetw.com
Retry DNS resolution: Check “Infinitely resolve remote server”
Leave proxy and local port alone.
User name/pass: Check the page you downloaded the config file from. Your username and password are on the right hand side
Leave “Renegotiate time” empty.
Under “TLS Authentication” check the box for “Enable authentication of TLS packets”. Paste everything from the config file between <tls-auth> and </tls-auth> into the text box.
Peer Certificate Authority: Select the name you chose of your imported CA
Client Certificate: Select the name you choose for your imported identity
Encryption algorithm: AES-256-CBC (256 bit key, 128 bit block)
Auth Digest Algorithm: SHA512 (512-bit)
IPv4 Tunnel Network: Leave blank
IPv6 Tunnel Network: Leave blank
IPv4 Remote Network: Leave blank
IPv6 Remote Network: Leave blank
Limit outgoing bandwidth: Leave blank
Compression: Disabled - No Compression
Type-of-Service: Leave unchecked
Disable IPv6: Sadly you have to check this
Don’t pull routes: Leave unchecked
Don’t add/remove routes: Leave unchecked
Advanced: Paste in this:
pull-filter ignore redirect-gateway
comp-lzo no
key-direction 1
fragment 1300
mssfix 1200
Double check your settings. If you are find click “Save”.
OPNsense should now be able to establish a connection to your VPN provider. Navigate to VPN -> OpenVPN -> Connection Status. If the tunnel is up it should look like this:

If your tunnel is not in state “up” you did something wrong. Check again your settings and have a look at the logfile to see what’s wrong.
Add a gateway
To be able to send traffic into the tunnel, a gateway is needed. The gateway will later be used in a firewall rule to redirect the traffic. First of all you need to find out the gateway IP. On the “Connection Status” dashboard is a column called “Virtual Addr”. That’s the IP given by the VPN provider for your tunnel end. You can calculate the other sides address by substracting 1 from the IP. For example: Virtual Addr value is 10.72.0.126. The address of the other side is therefore 10.72.0.125. Remember it!
Navigate to System -> Gateways -> Single and click “Add”. Fill in the blanks like this:

It doesn’t matter what you choose for “Interface”. Set your calculated IP address for “IP address”. If you are satisfied hit “Save”.
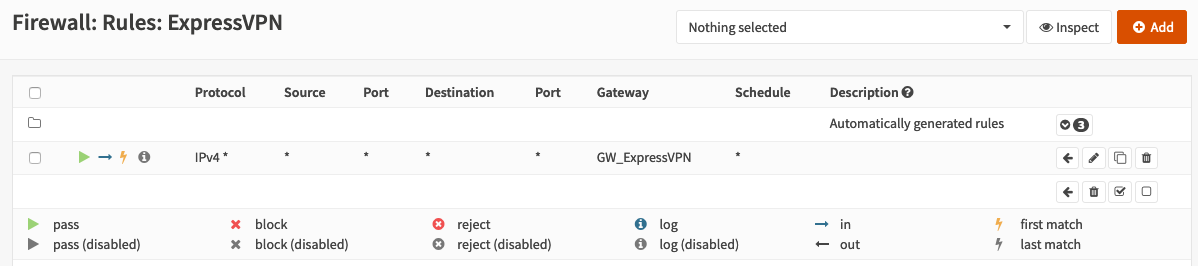
Add a firewall rule
Now you need a firewall rule. In my case I’ve an interface and dedicated subnet already configured. It’s called “ExpressVPN”. In you case this could be “LAN” or whatever you like to route over VPN.
Navigate to Firewall -> Rules -> Your subnet name and click on “Add”. Fill in the blanks:
Action: Pass
Interface: Choose your interface you are currently creating. In my case ExpressVPN
Direction: in
TCP/IP Version: IPv4
Protocol: any
Source: any
Destination: any
Open the advanced optopns and select your created gateway for “Gateway”. Double check your settings and hit “Save”. In the overview you should only have one rule, except the auto configured stuff! If you have multiple rules here you’ll have a bad time and probably a leak! Be sure you know what you are doing if you do things different here.
Double check that the column “Gateway” is set!
Now you are basically ready to go. At the moment the traffic generated from the devices in that subnet is routed over the VPN instead of WAN. But nothing will work. Why? IP packets are sent with the real source IP of your clients. But the VPN server on the other end doesn’t know what network you are using. So the traffic back is not reaching your clients. The only valid solution is to use NAT.
Add a NAT rule
You have to exchange the source IP address with the IP address of your tunnel endpoint. You need the value from the Virtual Addr column from above (10.72.0.126 in my example). Navigate to Firewall -> NAT -> Outbound and click on “Add”. Set the following settings:
Interface: Select your interface. In my case “ExpressVPN”
TCP/IP Version: IPv4
Protocol: any
Source address: any
Destination address: any
Translation / target: Choose “Single host or network” and enter your local tunnel IP. For example: 10.72.0.126. Select 32 from the dropdown menu
Validate your settings. If you are confident hit “Save”.
Testing
If you followed this guide carefully and used your brain, your whole traffic is now routed over a VPN. Your customers can now do everything they want without getting you into trouble. Do some extensive tests to make sure that no traffic is leaking. Never ever put any port-forwardings into that subet in action.
Pros and cons + Changeing IPs
Pros running this setup:
- Your devices don’t know that they are using a VPN. For them it’s plain network traffic.
- If you followed the steps carefully there is no way around the VPN. Be sure to use DNS resolvers from the public internet. If you use local DNS resolvers they may leak your real network over EDNS0.
However there are also downsides:
- No IPv6 :-(
When the tunnel goes down and up again you have to edit your config: Check what’s your current tunnel IP from the status dashboard. You have to edit the gateway IP and the NAT rule to get the traffic flowin again. This is some kind of annoying when your tunnel gets killed several times. My ISP gladly provides a stable internet connection and my tunnel is only renegotiated when I reboot my OPNsense for updates.This has changed! I’ve created a workaround.
Du hast einen Kommentar, einen Wunsch oder eine Verbesserung? Schreib mir doch eine E-Mail! Die Infos dazu stehen hier.
🖇️ = Link zu anderer Webseite
🔐 = Webseite nutzt HTTPS (verschlüsselter Transportweg) Zurück